Contents
Overview
In this project, you will create a train that will ride around on a track. When the track leaves the ground (or is very hilly), the train becomes more like a roller coaster.
Once it becomes a roller coaster, loops, corkscrews, and other things become possible.
The main purposes of this project is to give you experience in working with curves (e.g. the train and roller coaster tracks). It will also force you to think about coordinate systems (to make sure that things move around the track correctly). In the past, a big part of this project (especially in terms of time) was to make the 3D user interface, but this year, we will give you framework code so that you don’t need to worry about that so much.
The core of the project is a program that creates a 3D world, and to allow the user to place a train (or roller coaster) track in the world. This means that the user needs to be able to see and manipulate a set of control points that define the curve that is the track, and that you can draw the track and animate the train moving along the track. We’ll provide the framework code that has a world and manages a set of control points. You need to draw a track through those points, put a train on that track, and have the train move along the track.
This assignment is a perennial favorite of students, and you can see the previous project descriptions ( 2010, 2009, 2008, 2007, 2006, 2005, 2003, 2001, 2000, 1999) to see what to expect. Historically, students have really liked this project.
In the past (pre-2008), we expected students to build the system from scratch. More recently, we created a new sample solution that better shows off some of the features you might want to include. In the process, we decided that we would give you most of the code so you can focus on writing the interesting parts (in terms of the assignment). Yes, it will take you some time to figure out our code, but it will be much less than it would take you to write it yourself. (Although, if you want to work hard, you are welcome to do that – see below).
Basically in this project you will need to:
- Find your way around the framework code.
- Add the basic functionality: draw a track (curve) based on the control points and draw a train on that track. If you do the latter part correctly, the framework will make it easy to animate the train going around the track. You will also need to implement a "train view" (so the user can "ride" your train).
- Add more advanced features: nicer drawing of the track, arc-length parameterization, more kinds of splines, physics, …
- Add special effects and extra features to make it really fun. Really nice looking train cars, scenery, better interfaces for creating complex tracks, …
I must emphasize that the basic functionality is most important, and the core advanced features (arc-length parameterization) are the next most important things. Fancy appearance (like using textures and pretty lighting) aren’t the focus here – add them only if you have time after doing the more important things.
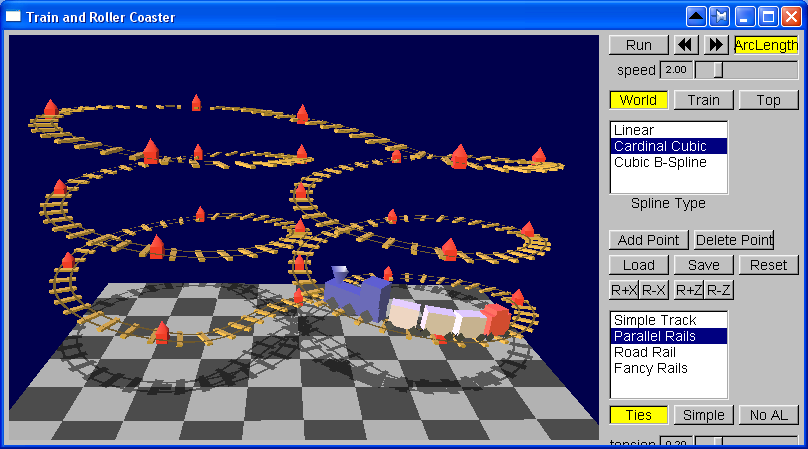
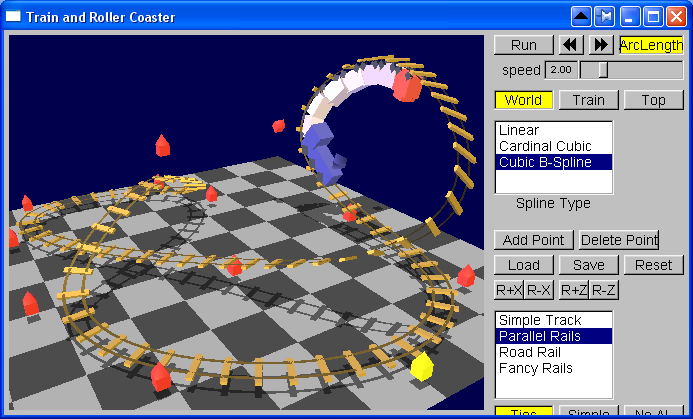
We have provided a sample solution (also see the discussion) of the possible features (at least the most common ones). We recommend that you play with it a bit to understand how it works. The example also has options that lets you see some of the most common mistakes and simplifications that students make.
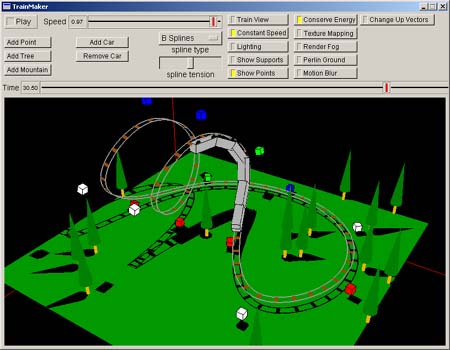
While the assignment was a little bit different in 1999, the basic idea was the same. For a totally crazy solution to this assignment, check out RocketCoaster. It was what happened when I let two students work as a team. I used to show some circa 1999 assignments as well, but they no longer run, so all you get are pictures:
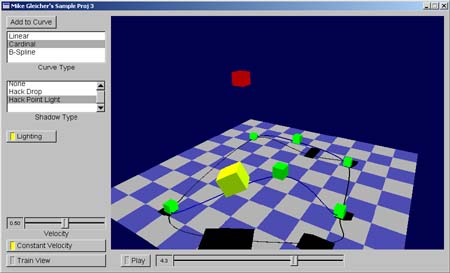
Mike’s sample train, circa 1999
Rob Iverson’s A+ assignment from 1999
Timetable / Punch Line
The project description gets to be quite long. So here’s a summary:
There is a checkpoint on October 22nd to make sure you’ve started the project. All you need to do is upload to Moodle a picture of your program running. This can be as simple as showing the framework (hit compile and print screen).
Note: exact grading depends on a bunch of factors (its not only do you implement the feature, but how well you do it, …).
You need to extend the framework so that there’s a curved track drawn between the points, and have a train drive around the track. Getting these basic features to work will get you somewhere between a C and a B.
You should add some extra functionality to the curves: draw them nicer, have arc-length parameterization (to have the train go at a uniform rate or to have rail ties that are evenly spaced), have the train oriented correctly. The more of these features you implement, the better your grade will be. Generally, getting the main ones of these (arc-length, orientation, some way of showing arc length like rail ties) gets about an AB or high B.
If you have extra time and energy – add extra bells and whistles to make it really cool. Make it look nice. Do fancy stuff like animating smoke coming out of the engine, make a really cool looking train, … Adding this stuff turns a very good assignment into a great one (an A). But – you can’t get an A if the curve features (like arc-length) don’t work correctly.
Ground Rules
You are to complete the assignment individually. We allow (encourage) you to discuss the project with your classmates, but the things you turn in must be substantively your own.
Your program must use OpenGL and run on the CSL Windows computers. (like everything else in this class). While we strongly recommend you use the framework code, this is not a requirement. The Framework/Example solution uses FlTk, but you can use any UI toolkit that you wish, providing its available in lab (talk to us) as we need to be able to build your program.
If you want to use other external libraries/code, please ask us. Something like a math library or data structures library is probably OK, but please check. If you really want, you could probably do this assignment in Java using JOGL (the Java OpenGL port) – but it might be a lot of work to do the UI.
The framework and example solution uses an old matrix/point class that was created just for this assignment. You are more than welcome to switch to using GLM instead.
The project is due on Wednesday, November 5th. Late projects are accepted according to the class late penalty.
When you turn in your project, please keep in mind the project handin requirements. You will need to turn in a ZIP file with only the necessary files – no extra files, no binaries, … And some text answering some questions.
The Basic Functionality and Framework
The most basic part of this assignment is to provide a "world" for the train track. Your program must do the following things (all of these are provided by the provided framework):
- Provide a user interface to look around the world, as well as providing a "top down" view.
- You must have a "ground" (so the track isn’t just in space).
- Provide a user interface that allows control points to be added, removed, or repositioned. Note: even if you do a very advanced interface, you should display the control points and allow for them to be edited manually.
- Allow for the control points to be saved and loaded from text files in the format used by the example solution. (or provide enough sample tracks that test out all the features)
- Provide lighting.
- Allow things to be animated (have a switch that allows the train to start/stop), as well as allowing for manually moving the train forward and backwards.
If you make your own framework, please make sure you can do all of these things. You won’t get many extra points for writing it yourself, but you will lose points if you don’t have the basic features.
The basic/essential features you must add:
- Have a track that is (at least) C1/G1. Your program should draw the track. You might want to support multiple kinds of curves (like a C(0) track with line segments for testing). But you must provide at least a C1/G1 track. (we recommend cardinal cubic splines). The track should be a loop, always, and should be either interpolate or approximate the control points. You might want to support C0/G0 tracks as well for testing.
- Your track should interpolate (when using interpolating curves) or approximate the control points. The framework allows for the control points to have orientations – you can ignore these if you want, or you can interpolate them too.
- Have a train that goes around the track (with a "run" button to start/stop it). The train should always be on the track. Your train need not be fancy, but it should be obvious which end is the front. And your train should not distort in wierd ways as it moves (if it is not rigid, it should be for a good reason).
- Have the train oriented correctly on the track. The train should always face forward if the track is flat, and mostly face forward on a 3D track. Getting 3D orientation correct in the hard cases (like loops) is a more advanced feature (see below).
- Allow the user to "ride" the train (look out from the front of the train). There should be a button or keystroke to switch to this view. (the framework has a "Train" view button)
- Have some scenery in the world besides the groundplane. (note that the example solution does not have this)
- Your program is properly documented, is turned in correctly, and has sufficient instructions on how to use it in the readme file.
- You should have a slider (or some control) that allows for the speed of the train to be adjusted (how far the train goes on each step, not the number of steps per second).
The framework code is designed to make it easy to add all of those things. In fact, there are "TODO:" comments explaining where to plug them in. See the the discussion of it here.
The framework code was used to make the sample solution. We didn’t give you all of the files, but you can see the "hooks" to the parts we didn’t give you (they are turned off with a macro). In some places, we intentionally left extra code for you to look at as a hint. The framework has some spiffier features (like drop shadows), and some features you may not need (the control points have "orientation").
Advanced Features
Meeting the basic requirements will get you a basic grade (definitely a C or better). But to get a better grade, and to really make the assignment fun, you should add some advanced features to your train.
Note: the exact point values for each of these is not given. The rough guide here will give you some relative importance (big features are worth more than small ones).
We will only check the features that you say that you have implemented correctly. Partial credit will be given for advanced features, but negative credit may be given for really incorrect features. (so, its better to not say you implemented a feature than to show us something that is totally wrong).
Also, remember that in your demo, you will have to show off the feature, so think about what demonstration will convince us that it works. For example, with arc-length parameterization, you’re best off being able to switch it on and off (so we can compare with the normal parameterization), and think about a track that really shows off the differences. You should probably turn in example tracks that show off the features.
- Arc-Length Parameterization (BIG)
Having your train move at a constant velocity (rather than moving at a constant change of parameter value) makes things better. Implementing this is an important step towards many other advanced features.
You should allow arc-length parameterization to be switched on and off to emphasize the difference, you should also provide a speed control. - Give a tension control for the splines (small)
This is so simple, but it will give you some intuitions for what the tension parameter does. For cardinal splines, you could have a different tension value for each control point. You should allow for tension to be adjusted interactively (like with a slider). - Approximating C2 Curves (little work, but valuable))
Having C2 Curves are better than C1 curves. (the 2nd order discontinuities would make the motion unrealistic). With C2 curves, your train may not go through the control points, but only approximate them. Interpolating C2 curves are harder (see below). Its best if you can switch between C1 and C2 curves. - Draw nicer looking tracks (medium)
The most basic track is just a line. To make something nicer (to make a tube or a ribbon), you need to consider the geometry of the curve.- Parallel rails
For parallel rails (like a real train), simply offsetting the control points (in world space) doesn’t work. You need to know the local coordinates as you go around the track. - Rail ties
Ties are the cross pieces on railroad tracks. Getting them right (uniformly spaced) requires good arc-length parameterization. In the example code, you can turn the arc-length parameterization on and off to see the difference.
- Parallel rails
- Correct Orientation in 3D (medium)
The simple schemes for orienting the train break down in 3D – in particular, when there are loops. Make it so that your train consistently moves along the track (so its under the track at the top of a loop).
One good way to provide for proper orientations is to allow the user to control which direction is "up" at points along the curve. This allows you to do things like corkscrew roller coasters. The sample solution does this (its why the framework has an orientation vector for each control point). Note that the train still needs to face forward, the given orientation is just a hint as to which way up should be. - Have Multiple Cars on Your Train (medium)
Having multiple cars on your train (that stay connected) is tricky because you need to keep them the correct distance apart. You also need to make sure that the ends of the cars are on the tracks (even if the middles aren’t) so the cars connect. - Have Real Train Wheels (medium)
Real trains have wheels at the front and back that are both on the track and that swivel relative to the train itself. If you make real train wheels, you’ll need arc-length parameterization to keep the front and rear wheels the right distances apart (make sure to draw them so we can see them swiveling when the train goes around a tight turn).
In the sample solution, the wheels are trucked (they turn independently), but each car still rotates around its center (so its as if they are floating above the wheels). You can do better than that. - Implement simple physics (medium – its actually not hard once you have arc-length)
Roller coasters do not go at constant velocities – they speed up and slow down. Simulating this (in a simple way) is really easy once you have arc-length parameterization. Remember that Kinetic Energy – Potential Energy should remain constant (or decrease based on friction). This lets you compute what the velocity should be based on how high the roller coaster is.
Even Better is to have "Roller Coaster Physics" – the roller coaster is pulled up the first hill at a constant velocity, and "dropped " where it goes around the track in "free fall." You could even have it stop at the platform to pick up people . - Adaptive subdivision (or sampling) (small to medium)
To draw the curves (or to compute arc length parameterizations), you need to sample along the curve (for example, to draw lines connecting the points). The curves are simple enough that simply sampling them uniformly and densely is practical. Adaptive sampling (when the curve is straight, fewer line segments are needed) is a better approach, but the benefits may be hard to see. If you implement adaptive sampling, be sure to have some way to show off that it really works.
Bells and Whistles
These are also advanced features. The difference is that they don’t connect directly with the pedagogical goal of the assignment. It is much better to have the advanced features (that are really central to the assignment) than these frills, but frills can be fun. And we will give you points for them (but remember, you can’t get points for frills unless the more basic stuff works)
- Improve the User Interface of the framework.
In particular, you could make tools that make it easy to make cool layouts (like an "insert loop" button). The way that point orientation is controlled right now is pretty bad, and can use some improvement. - Make totally over-the-top tracks
This is more of a piece of artwork, but to do something really fancy, you’ll probably write code to create the points. - If you’re really into trains, you could have different kinds of cars. In particular, you could have an engine and a caboose. Or maybe have switchable kinds of trains – like a diesel engine or a steam engine depending on a button.
- Switches and more complex connections in the layout
The track could have branches, … You’d need to have some way to tell the trains which way to go, and some way to deal with branching curves. - Multiple tracks and trains.
The framework is pretty much set up to have one track and train, but you could change this without too much hassle. You would need to make multiple World objects, but the hard part would be adapting the UI. - Direct Manipulation or Intepolating C2 Curves (BIG)
The easier form of C2 curves are approximating. Making it so that the user has direct control of the C2 curves (either having it interpolate the control points, or having the user adjust the track and having the system adjust the control points to make the track fit.
Note: to get full credit for this feature, you need to provide for total control over the curve – just translating a control point when the user tries to move the curve doesn’t apply.
* Sketch-based interface
Allow the user to sketch a rough shape, and then create a smooth curve from that. This is difficult to do well, but if you’re interested, we can suggest some interesting things to try. - Have People On Your Roller Coaster (small)
Little people who put their hands up as they accelerate down the hill are a cool addition. (I don’t know why putting your hands up makes roller coasters more fun, but it does). The hands going up when the train goes down hill is a requirement. - Headlight for the Train (small)
Have the train have a headlight that actually lights up the objects in front of it. This is actually very tricky since it requires local lighting, which isn’t directly supported. - Have the train make smoke (small/medium)
Steam trains are the coolest trains, even if they are being a roller coaster. Having some kind of smoke coming from the train’s smoke stack would be really neat. Animate the smoke (for example, have "balls of smoke" that move upward and dissipate). - Non-Flat Terrain for the ground
This is mainly interesting if you have the train track follow the ground (maybe with tressles or bridges if the ground is too bumpy). - Support Structures
When the track is in the air, you could create tressles or supports to hold it up (like a real roller coaster). Of course, you’d want to handle the case where the track crosses. - Scenery
Having other (non-moving) objects in the world gives you something to look at when you ride the train. - Tunnels
Make hills with tunnels through them for your train to go through. The tunnel should adapt its shape to the track (so it should curve like the track curves).
Some newer ideas (that no one has ever tried before):
- Have switches (branching tracks) – so that the tracks aren’t just a loop.
- Detect when the track crosses itself, and do something interesting (maybe have a bridge, or at least a crossing track).
- Have some way to limit the curvature so that the train doesn’t need to turn too sharply. (you might want to turn this on and off)
- You could make electric trains, which would require you to have a power line above the train, and poles to old them up along the track, and some way to place those poles in reasonable positions.
And the catchall category:
- Something so cool we can’t predict it
Yes, you might think of something to do that we didn’t mention here. If its really cool, we might give you points for it. We’d like you to focus on trying to do more with the curves aspect of this assignment (rather than making arbitrary eye-candy), so we won’t give you points for just making eye candy (e.g. putting textures on things) – there will be a whole project devoted to that. If you want to do something and you want to make sure it will be worth points, send the instructor email. Generally, if you’re thinking in this category, you’ve already gotten past worrying about getting enough points.
In the past people have come up with crazy stuff – some of them have become part of the assignment.
Ideas from the Train Expert
I showed the initial prototype to a 4 year old train expert (note: picture is circa 2008 when the train expert was 4 years old), and he made some suggestions. (Some of these are little things I need to add to the sample solution, some things I fixed already, others are ideas that you might consider).
- The engine should be a steam engine. And it should have a cow-catcher, and make steam.
- There should be a caboose. And it should be red.
- The wheels need to be round. And they need to turn around.
- The engine needs "chuggers" (the tie-rod that connects the wheels to the piston)
- "Why can’t the train go off the track?" (you could add a train wreck mode, but normally in this project the train has to stay on the track)
- The train should go backwards and forwards.
Documentation
Your README.txt should explain the following:
- a list of all the features that you have added, including a description, and an explanation of how you know that it works correctly. You can provide pictures. Note: we will only give you credit for features that you tell us that you did.
- an explanation of the types of curves you have created
- a discussion of any important, technical details (like how you compute the coordinate system for the train, or what method you use to compute the arc length)
- any non-standard changes that you make to the code
- anything else we should know to compile and use your program
You might want to make your readme.txt an html file (or a word document) so you can put pictures in it. Note that you will also need to turn in some pictures as described below. If your pictures are inside of a document, you still need to include them as separate pictures as well.
What to turn in
There is a checkpoint (Wednesday, October 22). The key idea is to make sure you’ve at least started the project – gotten as far as downloading and building the framework. All you need to do for the checkpoint is upload a screenshot of your program running. Even if it just looks like the empty framework.
By the deadline (November 5th, 11:59pm) you must turn in:
- Everything needed to compile your program (.cpp files, .H files, .vcxproj files, .sln files, and UI files or other things your program needs). Be sure to test that your program can be copied out of this directory and compiled on a Storm computer.
- A “beauty shot” – just showing off your program in a way that makes it look as good as possible.
- Your README file.
- Some example track files. You should not turn in the track files that we distribute (we give you a bunch) – only turn in ones that you made.
- Some screen shots (pictures of your program in action). Make sure to include pictures that:
- Clearly show that you have the basic features in place (a C1 track, …)
- Show off your train. (so we can see it clearly has a front, and can appreciate its coolness if its more than a box)
- Illustrate any cool features that can be showed off in a picture. (for example, you can show off arc-length parameterization and rail-ties by showing a picture with evenly spaced rail ties).
Late projects will be accepted according to the class late policy.
Some Hints
Use the framework. It will save you lots of time. Take some time to understand how it works. Play with the example solution to get a sense of what your program might be like. (and think of how you can do better!)
In case it isn’t obvious, you will probably use Cardinal Cubic splines (like Catmull-Rom splines). Cubic Bezier’s are an option (just be sure to give an interface that keeps things C1. For the C2 curves, Cubic B-Splines are probably your best bet.
You should make a train that can move along the track. The train needs to point in the correct direction. It is acceptable if the center of the train is on the track and pointing in the direction of the tangent to the track. Technically, the front and back wheels of the train should be on the track (and they swivel with respect to the train). If you implement this level of detail, please say so in your documentation. It will look cool. And it will get you points as an advanced feature.
Get the most basic things working first. Draw a simple track as a line. Make a simple non-oriented object go around the track.
In order to correctly orient the train, you must define a coordinate system whose orientation moves along with the curve. The tangent to the curve only provides one direction. You must somehow come up with the other two directions to provide an entire coordinate frame. For a flat track, this isn’t too difficult. (you know which way is up). However, when you have a roller coaster, things become more complicated.
The 1999 sample solution defines the coordinate frame as follows (which did not allow for loops):
- The tangent vector is used to define the forward (positive Z) direction.
- The "right" axis (positive X) is defined by the cross product of the world up vector (Y axis) and the forward vector.
- The local "up" axis is defined by the cross product of the first two.
Doing arc-length parameterizations analytically is difficult for cubics. A better approach is to do them numerically. You approximate the curve as a series of line segments (that we know how to compute the length of). A simple way to do it: create a table that maps parameter values to arc-lengths. Then, to compute a parameter value given an arc length, you can look up in the table and interpolate.
Alternatively, you can do a little search to compute the arc length parameterization. If you have a starting point (u) in parameter space, and a distance you want to move forward in arc length space, you can move along in parameter space, compute the next point, find the distance to it, and accumulate.
The example solution actually does it in a different way: it takes uses a linearization of the arc length equation to estimate how to scale the velocities. It’s probably not as accurate as the methods described above.
Be creative and have fun!
But What Grade Will I Get?
Sorry, but its really hard to know the exact grading standard ahead of time.
We are not sure if we will be doing grading by live demos or not. Live demos are fun, but with 70 students, they may be impractical.
{ 3 trackbacks }