
CS559
Fall 2005
Lectures/Notes
Tutorials
Sample Code
An FLTK Window
Adapted from Stephen J. Chenney's Tutorial
Modified by Yu-Chi Lai at 2005
This tutorial will show you how to open an FLTK window. We will build on the project from the previous tutorial so please complete it first if you haven't already.
- Add a Window Class
- Modify Main
- Add Include Paths
- Add Library Paths
- Project Settings
- Build and Run the Program
- Set up the FLTK at home
Step 1: Add a Window Class
We need to add a class to project which will control our FLTK window. We begin by adding two new files to the project. We want to add a new source file or C++ File (.cpp) in VS03 called MyWindow.cpp and a new header file or Header File(.h) in VS03 called MyWindow.h. These files can be added just like main.cpp was in the previous tutorial.
We now need to add the code for this class. First the header file MyWindow.h:
#include <iostream>
using namespace std;
int main(int argc, char** args)
{
	// Notice I start from i=1 not 0 because the args[0] is reserved
    //        for the name of this program.
	for(int i = 1; i < argc; i++)
	{
	     cerr << i << "th argument is " << args[i] << "\n";
	}
}
#ifndef MY_WINDOW_H
#define MY_WINDOW_H

#include <Fl/Fl_Window.h>

class MyWindow : public Fl_Window
{
	public:
		MyWindow(int width, int height, char* title);
		virtual ~MyWindow();
};

#endif
Lets look at this for a second. It defines a class called MyWindow which is derived from the FLTK base window class Fl_Window. The file Fl_Window.h was included to get the definition of this class. Notice how the Fl directory is prepended to this file. All FLTK files should be prepended with Fl when they are included. Our window class has only a constructor (which takes three arguments) and a destructor. The underlying FLTK window class is going to do all the rest for us.
The code for the source file MyWindow.cpp contains the implementations of the constructor and destructor.
#include "MyWindow.h"

MyWindow::MyWindow(int width, int height, char* title)
         : Fl_Window(width, height, title)

{}

MyWindow::~MyWindow()

{}
The constructor just passes its arguments to the constructor of the base class, the FLTK class Fl_window. The destructor doesn't do anything yet but we'll need it later so we might as well make it now.
Step 2: Modify Main
Now that we have a window class we need to modify our main function to make use of it. Here's the updated contents of main.cpp.
#include <Fl/Fl.h>
#include "MyWindow.h"
int main(int argc, char** args)
{
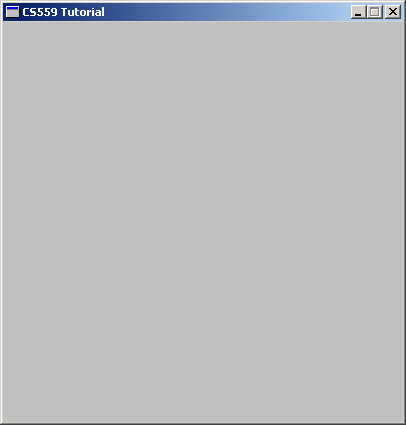
MyWindow myWindow(400, 400, "CS559 Tutorial");
myWindow.show();
Fl::run();
return 0;
}
This new version of main creates an instance of our window class with a size of 400x400 pixels and a title of "CS559 Tutorial". FLTK windows are not visible until they are shown. This allows you to create a window, set various attributes and then display the window. If it was visible initially the user might see the attributes of the window changing as you initialized them. So to make our window visible we call its show() method. This is one of the many method MyWindow inherited from the base class Fl_Window.
Now we tell our window to show itself we have only one step remaining. We must tell the FLTK system to start processing events. FLTK is an event driven system, meaning it responds to user inputs. FLTK will not do anything until we tell it to start the event processing loop. We do this my calling Fl::run() which was included from the file Fl.h.
Step 3: Add Include Paths
We've now got all the code we need and we almost ready to build our project
but first we must tell VS03 where to find the FLTK files that we are using.
We must tell it where to find the header files (*.h) that we've included
in our project, such as Fl.h. It also need to know where to find
the FLTK library that we've built for you.
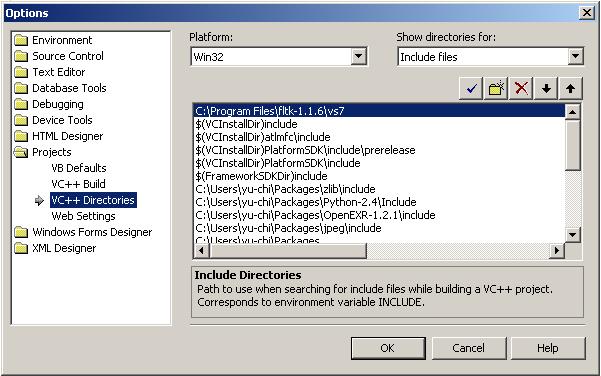
Choose Tools -> Options from
the VS03 menus and you should get the dialog to the right.
In the left hand pane go to Projects -> VC++ Directories, then choose
Include Files from the Show
directories for drop down box. This is a list of directories
the VS03 will search for header files when you include them between < and >, such as #include <Fl/Fl.h>. We've placed
a copy of all FLTK headers in C:\Program Files\fltk-1.1.6\vs7 So select
the new folder button (the yellow folder) and either browse to this directory
or copy and paste it in.
Step 4: Add Library Paths
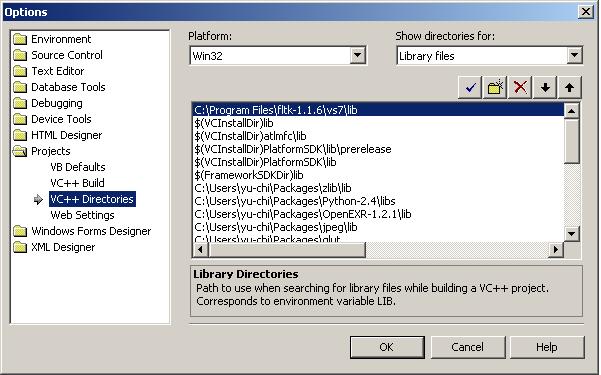
We now need to tell VS03 where to find the pre-built fltk libraries.
Select Library Files from the Show directories
for drop down box and add C:\Program
Files\fltk-1.1.6\vs7\lib to the top of the list.
We've now set the include and library paths in VS03. This setting will persist through all projects, hence you only need to set this once. All future 559 projects will be able to find FLTK headers and libraries in these directories.
Click OK.
Step 5: Project Settings
Now that VS03 knows where to find the FLTK library we need to tell it
which libraries we're interested in. Unlike the include and library
paths this must be done each time you create a project that needs them.
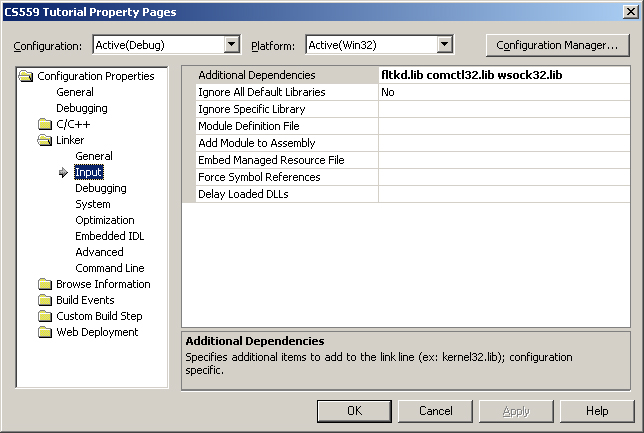
Open the Class View window, right
click on our project (CS559 Tutorial),
and choose Properties.
Make sure Configuration is set
to Debug and Choose Linker -> Input from the left hand pane.
Add fltkd.lib comctl32.lib wsock32.lib
to the Additional Dependencies.
Make sure the libraries are separated by whitespace.
fltkd.lib is the debug library for FLTK. We always use debug
builds for this course for simplicity. comctl32.lib and wsock32.lib are Microsoft Windows libraries
which FLTK depends on.
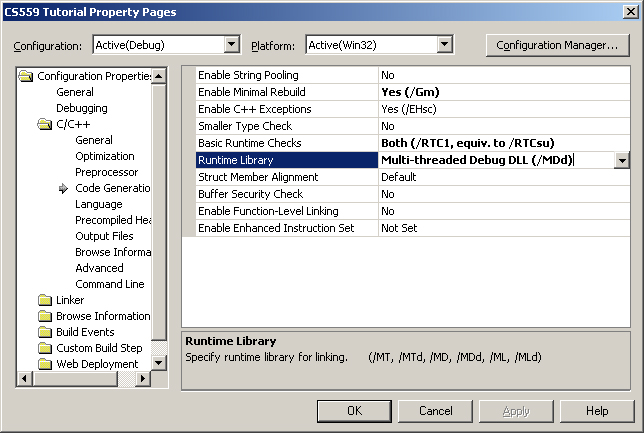
One final setting for the FLTK library. The FLTK library uses a
debug version of the C runtime from a dll (dynamically linked library).
What does that mean? It means the FLTK library loads the basic C
library in a different way they the default VS03 project so we need to
change our project to match FLTK.
Choose C/C++ -> Code Generation
from the left hand pane and set the Runtime
Library to Multi-threaded Debug
DLL (/MDd).
Click OK.
Step 6: Build and Run the Program
|
 |
Step 7: Set up the FLTK at home
You need to copy the entire directory C:\Program Files\fltk-1.1.6 into your home computer's C:\Program Files. Thus you can use the same option and project setting you use in this tutorial.Note: Warning
Normally, if you would like to write a good and robust program, you should pay attention to the warnings because we have ever got into a big trouble when we neglected some of the warnings. However, all the warnings in this program come from FLTK library and we cannot remove it unless we modify the FLTK library. It is very disturbing for us to get other important warnings. Here I provide a solution to remove these FLTK warning and let other warnings pass through. Everytime when you need to include the FLTK header file you need to put these set of "#pragma ..." to enclose those "includes". They tell the compiler not to generate the warnings which is listed in the number list in these "includes".#pragma warning (push) // Disable the warning between the block of push and pop // The list of numbers of warning we will like to disable #pragma warning(disable : 4204) #pragma warning(disable : 4244) #pragma warning(disable : 4312) #pragma warning(disable : 4083) ... // List of all fltk include file for example #include <Fl/Fl_Window.h> #pragma warning (pop) // Enable the warning again