CS559
Fall 2005
Lectures/Notes
Tutorials
Sample Code
Displaying an Image
Adapted from Stephen J. Chenney's Tutorial
Modified by Yu-Chi Lai at 2005
This tutorial will build on the previous tutorial, adding image loading, display, and modification to our FLTK window.
- TargaImage Class
- Draw Method
- libtarga
- Build and Run the Program
- Modify the Image
- Build and Run the Program Again
Step 1: TargaImage Class
To aid you with image loading and saving in this course we will provide
you with the TargaImage class.
This class provides methods to load and save targa (.tga) images along with
a few utility methods. First get the files for TargaImage
and a few targas to work with (courtesy of FreeFoto.com)
and from the links below and save them in the same directory as your VS03
project.We need to add the TargaImage files to our project. Go to File -> Add Existing Item and choose TargaImage.h. Do the same for TargaImage.cpp. Now we're ready to use some images in our project. We'll learn how to use TargaImage as we go.
Step 2: Draw Method
We need a way to display our image every time our window needs to be redraw. FLTK provides a method that will allow us to do just that. FLTK calls this function draw(). We need to add a declaration for the draw() method and we're going to need a TargaImage to display so we might as well add it while we're here. Add the following to MyWindow.h.
...
class MyWindow : public Fl_Window
{
  public:
	MyWindow(int width, int height, char* title);
	virtual ~MyWindow();
	virtual void draw();
	TargaImage* image;
};
. . .
We need to include the header for TargaImage before we can actually use it so add this line near the top of MyWindow.h.
...
#include <Fl/Fl_Window.h>
#include "TargaImage.h"
class MyWindow : public Fl_Window
. . .
Now that we have a pointer to a TargaImage we need to initialize it so we don't have a bad pointer. We'll initialize it in the constructor.
MyWindow::MyWindow(int width, int height, char* title)
		: Fl_Window(width, height, title)
{
	image = NULL;
}
We also need to release the memory used by any TargaImage that image points too. We'll take care of this in the destructor.
MyWindow::~MyWindow()
{
	delete image;
}
Now we need to create a definition for the draw() method. We add this code to the bottom on MyWindow.cpp. Let's look at the code and then we'll go over what it does for us.
void MyWindow::draw()
{
	// setup image
	static bool firstTime = true;
	if (firstTime)	{
		image = TargaImage::Load_Image("flower.tga");
	if (image == NULL)
		std::cerr << 	"Failed to load image." << std::endl;
	else
		size(image->width, image->height);

	firstTime = false;
	}

	// draw the image
	if (image != NULL)
		fl_draw_image(image->data, 0, 0, image->width, image->height, 4);
}
The draw() method consists of two parts. The first is some setup code. We use the static boolean firstTime to assure that we only execute this code once as draw() will get called every time our window needs to be redrawn.
The setup code uses the TargaImage class to load the flower.tga targa and points our image pointer image to this new TargaImage. Load_Image() returns NULL if it failed to load the requested targa file, so we check to make sure our image was loaded and if it wasn't we print an error message. If it loaded ok, we need to make sure the image can fit into our window. We call the FLTK method size() (inherited from our base class of Fl_Window) to fit our window to the image we've loaded. size() takes the width and height the window should occupy so we'll simply take those from our newly loaded TargaImage.
The second part of the draw method actually draws the contents of the window. The only thing we're going to have in our window is the image we've loaded so that's all we need to draw. We'll use an FLTK function to draw our image data into the window, fl_draw_image(). fl_draw_image takes a pointer to the image data, the horizontal and vertical positions of the top left corner of the image in window coordinates, the dimensions on the image, and the span of the image data. We want the image to cover our whole window so we'll place it in the upper left corner (0, 0) and we can get the dimensions from the TargaImage class. The span of the image data is the number of bytes between consecutive pixels. TargaImage always represents an image a set of four bytes per pixel (RGBA) with no extra padding, so the span of any image data loaded with TargaImage is always four.
That's all the code we need to load and display an image using FLTK and the TargaImage class. The code we've added uses cerr and the FLTK function fl_draw_image() so we need to include the headers in MyWndow.cpp.
...
#include "MyWindow.h"
#include <iostream>
#include <FL/fl_draw.h>
...
Step 3: libtarga
As we described in LibTarga tutorial, you need to copy the libtarga.cpp and libtarga.h into the current work directory and then adding into the current project.
Step 4: Build and Run the Program
Ok we're ready to build and run our program. Choose Build -> Build Solution to compile and link the program and Debug -> Start Without Debugging to run it. You should see a window just like this. Before we quit lets get a little practice manipulating the image data in our TargaImage. |
 |
Step 5: Modify the Image
To get a little practice with using the image data in a TargaImage we're going to add some code to copy part of a second image into our current flower image. We'll add a new method to do this for us. First we need to add the declaration of the method to MyWindow.h.
...
virtual ~MyWindow();
virtual void draw();
void ModifyImage();
TargaImage* image;
...
We need to call our new method after we load the image so add the call to the draw() method.
...
	image = TargaImage::Load_Image("flower.tga");
	if (image == NULL)
		std::cerr << "Failed to load image." << std::endl;
	else {
		size(image->width, image->height);
		ModifyImage();
	}

	firstTime = false;
}
...
Now lets take a look at the definition of ModifyImage().
//***************************************************************************************
//
// * Modified the image
//=======================================================================================
void MyWindow::ModifyImage(char* second_image_name)
//=======================================================================================
{
	if (image == NULL)
	  return;
	TargaImage* secondImage = TargaImage::Load_Image(second_image_name);
	if (secondImage == NULL){
		std::cerr << "Failed to load second image." << std::endl;
		return;
	}
	int sourceCenterX = 200,
	  sourceCenterY = 200,
	  destinationCenterX= 200,
	  destinationCenterY = 150,
	  radius = 50;
	for (int yOffset = -radius; yOffset <= radius; ++yOffset){
		int sourceY = sourceCenterY + yOffset; int
		destinationY = destinationCenterY + yOffset;
		if (sourceY >= 0 && sourceY < secondImage->height &&
			destinationY >= 0 && destinationY < image->height){
			for (int xOffset = -radius; xOffset <= radius; ++xOffset){
				int sourceX = sourceCenterX + xOffset;
				int destinationX = destinationCenterX + xOffset;
				if (sourceX >= 0 && sourceX < secondImage->width &&
					destinationX >= 0 && destinationX < image->width){
					unsigned char* sourcePixel = secondImage->data + (sourceY * secondImage->width + sourceX) * 4;
					unsigned char* destinationPixel = image->data + (destinationY * image->width + destinationX) * 4;
					for (int i = 0; i < 4; ++i)
						destinationPixel[i] = sourcePixel[i];
				}
			}
		}
	}
	delete secondImage;
}
This looks like quit a bit of code so lets take our time and walk through what it does.
We begin by checking if our window already has an image loaded, if it doesn't we have no destination for our image copying so we quit. We then attempt to load a second image called tree.tga. We use the same function as before. We check to make sure our second image loaded, if it didn't we print and error message and quit.
Now we define a bunch of variables that are going to control the source, destination position, and size of the area to copy. The source position is the center of the area in the newly loaded second image that we wish to copy. The destination position is the center of the area that we're going to copy to in the destination image (the one we loaded in draw()). The radius is the distance we'll go in each of the four cardinal directions from the center positions to define the areas when copying. By changing these values you can experiment with copying different portions of the source image to different locations in the destination image.
Ok now that we've loaded our images and defined the areas to copy to and from lets look at the code which actually does the copying. We begin by iterating through each row in the area to copy from and to. If either the source row or destination row are outside of their respective images we skip the row. Otherwise, we walk over the columns in the area for that row. We calculate the source and destination column for each entry in the row and test to see if its within the respective image just like we did with the rows. If the source and destination columns are both acceptable we can copy the current source pixel to the current destination pixel.
The easiest way to do this is to get a pointer to source and destination pixels. The formula for the offset into the image data for a pixel at position (x, y) is:
index of pixel(x, y) = (y * imageWidth + x) * numComponents
Image data is stored in row major order starting with the upper left pixel of the image. This means the image data stores all of the pixels in the first row from left to right followed by all the pixels in the second row from left to right, etc through all the rows in the image. Hence to find the pixel location we multiply the row of the pixel we want by the width of the image and then add the column of the desired pixel. This will give us the index of the pixel in the image data array. There's one catch though, each pixel in the image has multiple components (red, blue, green, etc), hence each pixel is using multiple slots in the array so we need to multiply our pixel index by the number of components per pixel to get the actual index into the image data. All TargaImage images have four components (red, green, blue, alpha) so for any image data loaded with the TargaImage class we'll always be multiplying by four to get the actual index into the image array.
The above code uses this formula to calculate a pointer to both the source and destination pixels. It then iterates through each of the four components of the pixels, replacing the destination pixels's component with the corresponding component of the source pixel.
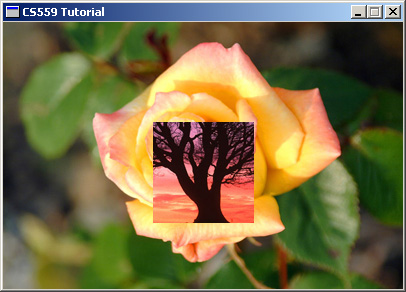
Step 6: Build and Run the Program Again
Ok we're ready to build and run the final version of our program.
Choose Build -> Build Solution to compile and link the program and Debug -> Start Without Debugging to run it. You should get the image to the right. Feel free to move the source and destination points in the code to verify that our code works even if part of the source or destination area is outside of the respective image.
Hope these tutorials have made you somewhat comfortable with VS03, FLTK, and working with image data cause its time to start on the first project for 559.
Source code for this tutorial.