CS559
Fall 2005
Lectures/Notes
Tutorials
Sample Code
Using the LibTarga library
Adapted from Mark Pingel's Tutorial
LibTarga is a library for reading and writing images in the TARGA image file format. It was written by Alex Mohr for use by students in CS559, and for other graphics projects. This document is meant to give you a basic idea of how to use libtarga within the CS environment at UW. For more complete documentation Refer to the code.
Using LibTarga
In order to use the libtarga code in your projects, you are going to add the libtarga.c and libtarga.h into your project.
1. Download libtarga.c and libtarga.h and put them into to your working directory
2. Right click on project "Your
Project Name" at solution explorer and choose Add->Add
Existing Item...
3. Select the libtarga.c and libtarga.h from the Add Existing Item window's
file explorer.
4. Click Open.
5. Check the solution explorer. The libtarga.cpp should be added to the
folder Source Files and libtarga.h should be added to Header
Files.
READING A TARGA IMAGE
1.The function used for reading images is
void* tga_load( const char * file, int * width, int * height, unsigned int format );
- const char* file : The filename of the .tga image we wish to read in
- int* width : We pass in a pointer to an integer because the tga_load function will fill in this value with the appropriate width for the image
- int* height : We pass in a pointer to an integer because the tga_load function will fill in this value with the appropriate height for the image.
- unsigned int format : There are two values that you can use for this :
TGA_TRUECOLOR_32 : RGBA
TGA_TRUECOLOR_24 : RGB
Note that only TGA_TRUECOLOR_32 supports an alpha channel.2. If there is an error, there are several functions available to help you debug the problem:
int tga_get_last_error();
const char * tga_error_string( int error_code );
So, if you want to debug a problem in the targa code, you could use a statement such
printf(tga_error_string(tga_get_last_error()));
3. So, how can we actually load an image?
Here is some sample code for loading in an image
unsigned char* targaimage;
int wdt,hgt;
targaimage = (unsigned char*)tga_load(imgname,&wdt,&hgt,TGA_TRUECOLOR_32);
Warning: you need to deallocate the memory or you may get into crash when run the loading several time.
Remember to deallocate the memory that tga_load allocates. You could use:
free ( targaimage );
to accomplish this.
WRITING A TARGA IMAGE
The following function may be used to write a targa file:
int tga_write_raw( const char * file, int width, int height, unsigned char * dat, unsigned int format );
The function returns a 1 if successful and a 0 if not successful.
- const char* file : The name of the targa file we wish to write
- int width : The known width of the targa image.
- int height : The known height of the targa image.
- unsigned char* dat : The array holding the image information
- unsigned int format: Same formats as before, only this time it should be whatever format is being stored, not which we wish to load.
Examples
Here is a simple example about how to use it. Since I have put comment on the code, I won't discompose it to explain each line's function
1. Modify Main
#include <iostream>
#include "libtarga.h"

using namespace std;

int main(int argc, char** args)
{
	// Check whether the argument is four or not
	printf("The argc %d\n", argc);
	if(argc != 4){
		std::cerr << "Did not have enough input arguments which should be \n";
		std::cerr << "1. Source 2. Destination filenames 3. Size of the square\n";
		return 0;
	}

	// Load in the image
	unsigned char   *image_data;
	int		         width, height;
	char*            input = args[1];
	char*            output = args[2];
	int              radius = atoi(args[3]);

	// Check the input name
	if (!input) {
		std::cerr << "No input is given." << endl;
		return 0;
	}// if

	// Check the output name
	if (!output) {
		std::cerr << "No output is given." << endl;
		return NULL;
	}// if

	// Check the square size
	if(radius <= 0){
		std::cerr << "The size of square is negative." << endl;
		return NULL;
	}

	// Load in the image
	image_data = (unsigned char*)tga_load(input, &width, &height, TGA_TRUECOLOR_32);
	// Chech whether it succeed or not and print out necessary error message
	if (!image_data) {
		std::cerr << "TGA Error: %s\n", tga_error_string(tga_get_last_error());
		width = height = 0;
		return 0;
	}

	// Check the square size
	if(radius * 2 > width || radius * 2 > height){
		std::cerr << "The size of square bigger than image." << endl;
		return 0;
	}

	// Copy the image center
	int sourceCenterX          = width / 2;
	int sourceCenterY          = height / 2;

	// Go through the center of the square
	for (int yOffset = -radius; yOffset <= radius; ++yOffset)  {
		// Compute the index at Y coordinate
		int sourceY = sourceCenterY + yOffset;
		if(sourceY >=0 && sourceY < height) { // Check whether Y is over boundary
			for (int xOffset = -radius; xOffset <= radius; ++xOffset) {
				int sourceX = sourceCenterX + xOffset; // Compute the index at X coordinate
				if(sourceX >= 0 && sourceX < width) { // Check whether X is over boundary
					int index = (sourceY * width + sourceX) * 4; // Compute the index for this pixel

					image_data[index]   = 0;   // Change red to 0
					image_data[index+1] = 255; // Change green to 1
					image_data[index+2] = 0;   // Change blue to 0
					image_data[index+3] = 255; // Change alpha to 1
				} // end of if sourceX
			} // end of for
		} // end of if sourceY
	} // end of for

	// Save the image
	if (!tga_write_raw(output, width, height, image_data, TGA_TRUECOLOR_32)) {
		cout << "TGA Save Error: %s\n", tga_error_string(tga_get_last_error());
		return 0;
	}

	printf("Finish image loading and processing\n");
	return 0;

}
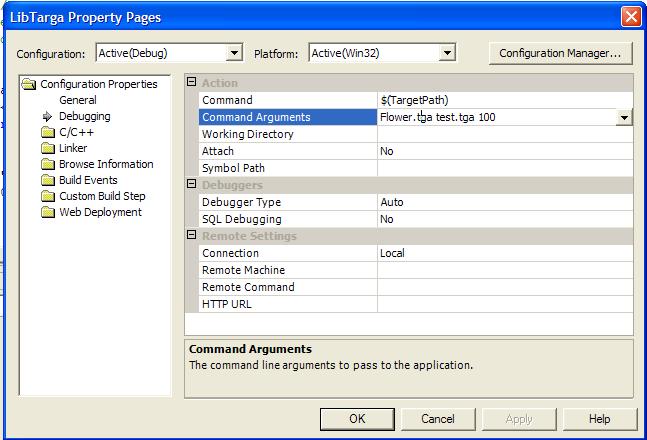
2. Change the command line argument
You need to input command line argument with "Flower.tga test.tga 100". How can you do it. Please refer to command line argument tutorial
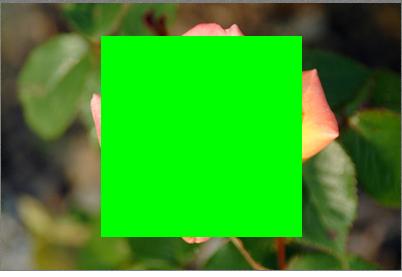
3. Output
After building the entire project and running it. You will find a file name "test.tga" inside the project directory. When you use the irfan or other image viewers to open it, you should be abel to see this picture