
main-p2
Project 2 - Trains and Roller Coasters
- Update 10/22/2007 - Phase 4 and 5 Assigned
- Update 10/22/2007 - Phase 3 Assigned - here it is
- Update 10/19/2007 - New (later) due date for Phase 3
1.@ Overview
In this project, you will create a train that will ride around on a track. When the track leaves the ground, the train becomes more like a roller coaster.
The two main purposes of this project are to give you experience in working with curves (e.g. the train and roller coaster tracks) and to give you experience with writing interactive 3D programs.
What you will turn in for the “final” part of the project is a program that creates a 3D world, allows you to position a track within the world and adjust it interactively, can make a roller coaster follow along that track, and will allow you to ride the roller coaster.
There are two example solutions to this project in P:/course/cs559-gleicher/public/bin, both from 1999. One is a version that I wrote (called mikes-Train) and another was written by a really good student (robs-train). I recommend that you try them out to get an idea as to what you’ll be doing.
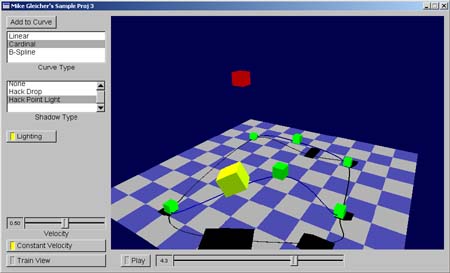
Mike’s sample train, circa 1999

Rob Iverson’s A+ assignment from 1999
While the assignment was a little bit different in 1999, the basic idea was the same. For a totally crazy solution to this assignment, check out RocketCoaster. It was what happened when I let two students work as a team. And they were really good students.
Note: at the beginning of the project, you might not understand all the things we’re going to ask you to do. Don’t worry - you’ll be learning it all soon enough!
If you’re curious, you can look at previous years’ projects (2006, 2005,2003,2001,2000,1999)to see what to expect. This year’s will be slightly different, but the basic ideas will be the same. Historically, students have really liked this project.
2.@ Project Phases
Creating a world and a roller-coaster might seem a bit intimidating, especially if you haven’t done much graphics programming before. Therefore, in this project, you will work up to the final roller coaster program through a series of phases:
- Phase 1: Transformations Practice - (due October 15th)
- Phase 2: OpenGL Programming Signs of Life - (due October 22nd)
- Phase 3: Theoretical Background - (due October 29th) Before implementing the roller coaster, it will be important to make sure you really understand the concepts of curves and 3D. So, to give you practice, there is a written homework assignment. Coincidentally, the midterm exam is this same day, and the homework will provide an excellent review!
- Phase 4: 3D User Interface Checkpoint - (due November 5th)
- Phase 5: The Roller Coaster Program!! - (due November 12th)
Remember: while the majority of you project grade will come from our evaluation of your final program, the earlier stages do count too! There will be a 1/2 letter grade penalty to your project grade for not completing the preliminary stages. In addition, the written assignments are important practice for the exams, so blowing them off will also hurt you there. Finally, the checkpoints are important to make sure you’re making progress over the entire 5 weeks of the project: this project is a lot to do in 1 week, but not so bad if you think of it as a 5 week effort.
3.@ Some Basic Ground Rules
You are to write this program doing the drawing with the OpenGL graphics library under Windows. You may use whatever user interface tools you wish (we recommend FlTk, but GLUT would be an acceptible alternative). See the GL Survival kit for thoughts on this. There is a lot of available sample code, but you do not have to use it.
You are to complete the assignment individually. We allow (encourage) you to discuss the project with your classmates, but the things you turn in must be substantively your own.
The basic part of this assignment is to provide a train going around the track. You must:
- Provide a user interface to look around the world.
- Provide a user interface that allows control points to be added, removed, or repositioned. Note: even if you do a very advanced interface, you should display the control points and allow for them to be edited manually.
- Have a track that is (at least) C1. Your program should draw the track.
- Have a train that goes around the track (with a play button to start/stop it). The train should always be on the track. Your train need not be fancy, but it should be obvious which end is the front.
- Have the train oriented correctly on the track. The train should always face forward if the track is flat, and mostly face forward on a 3D track (some cases, such as vertical tracks or loops can be hard, a basic assignment doesn’t have to get those right).
- Allow the user to “ride” the train (look out from the front of the train).
- Have some scenery in the world besides the groundplane.
- Your program is properly documented, is turned in correctly, and has sufficient instructions on how to use it in the readme file.
If you’re curious, my sample solution (mikes-train.exe) does not do all of these. (the train doesn’t have a front, and the only scenery is the point light source - also, there’s a wierd bug where the train stretches out when it goes down a hill).
If your assignment does all of these basic parts, you will get at least a C. If your assignment doesn’t do these basic parts, we will not look at its advanced features.
4.@ Phase 1 - The Transformations written assignment
This written assignment is described on this page.
5.@ Phase 2 - OpenGL Programming Signs of Life
The purpose of this phase is to:
- Make sure you have worked out the mechanics of getting and OpenGL program to compile.
- Can work out the basic mechanisms for making interactive programs.
- Can make programs that do animation in OpenGL.
These are all essential elements for your roller coaster. So we want you to try doing these things without all of the added complexity of curves and 3D.
You must turn in a program that:
- Has sufficient documentation that the TAs can compile the program and use it enough to confirm that it has all of the required features.
- Has an OpenGL window.
- Has a collection of “points” (drawn as small shapes like squares).
- Allows the user to add and delete points.
- Allows the user to select one of the points and move it around.
- Has an “animate mode” that when turned on has another shape orbit the selected point (like a moon orbiting). The spinning should be animated. It needs to start and stop when the animate mode is turned off.
You can make whatever user interface you like for this. You can make it direct manipulation (where the user clicks on the points and drags them around). You can make it keystroke driven (use the arrow keys to move things, and other buttons to cycle through the selection).
We encourage you to come up with creative programs that do cool things (yet meet the minimal restrictions). Making creative and cool programs is not only fun, but a great way to experiment with the graphics ideas we’re learning in class.
Here are some examples of how you can fulfill the Stage 2 requirements (Simple 2D UI, FLTK Widgit Variant, Mouse Picking & Dragging Variant). (new!)
The tutorials will guide your through learning the basic skills you need to complete this assignment. Be sure to read the OpenGl Survival Guide for help getting started. The Main.Tutorials will help you with the mechanics of getting your program to compile and give your some ideas for user interfaces. The Main.SampleCode will provide you with useful elements for building things (particularly RunButton).
6.@ Phase 3 - Theoretical Background
In order to make a roller coaster, you need to understand curves and perspective transformations. So we’ll give you a written assignment described here designed to give you some practice.
The exam will cover the same material, so this assignment will be good practice for the exam. In fact, a portion of the problems from this written assignment will appear on the exam (with some of the details changed to discourage you from trying to just memorize the answers).
The assignment will be posted on or before October 23rd.
Note: Unlike every other thing in this class, this written assignment will be do at the begininning of the exam. (everything else is due at 11:59pm).
We will consider your homework assignment to be on-time if you turn it in before Tuesday, October 30th at noon. Note: there is good incentive to do the work earlier, since the questions may be on the exam.
7.@ Phase 4 - Programming Checkpoint
We want to make sure that everyone is making good progress on the project. In particular, we want to make sure that by November 5th (one week before the project is due), you’ve at least gotten the basic 3D interactions working.
For this phase, you have to show that you have part of your project done. We’re just checking for the first pieces to make sure you’ve started.
Be warned: if you only have these basic requirements done by the checkpoint, you still have a lot of work to do. To avoid having a hectic week before the project is due, we recommend that you have more than the checkpoint requirements done.
Your roller coaster program will need to have all of the following features, so you need to make a program that does all of these things. Basically, this program will provide the “world” that the roller coaster runs in:
- You must have a “ground”
- You must have points that can be positioned in the world. The user needs to be able to adjust the positions of points, add points, and delete points.
- The user must be able to move the camera around to look around the world.
- There must be some other objects in the world besides the points (scenery to look at when riding the train/roller coaster)
- You need to be able to start and stop the animation in the world. When there is a roller coaster that will be moving. For now, you must have something going in a circle. That object moving in a circle should have a clear front (good practice for making a train that has a front).
We don’t care what user interface you make to do these things. Ultimately, we care that you can position points in the world (since these will serve to specify where the track goes), that you can look around the world (so we can look at your creations), and that you can animate the roller coaster going around the track.
How you control the camera and points is up to you - we will give you example code (look here) that gives you some ideas, but:
- You can have buttons for cycling between the points, and sliders that adjust the positions of the selected point
- You can have sliders or buttons that move the camera and lookat point
- You can implement picking and a 3D dragging UI (the sample code has something called a “mousepole”)
- You can use the direct manipulation ARCBALL camera code
We actually encourage you to use the example code to make your interface. The main part of this assignment should be the train, not the UI. (at the checkpoint, the train isn’t necessarily due yet)
Bells and Whistles (like hack shadows) always make things nicer (and drop shadows actually make things easier to use since they are a depth cue).
What to turn in: You should turn in your .cpp and .H files, your .vcproj and .sln files, and a screen shot of your program. Please have a README.txt give a brief explanation of what your user interface is, and what (if any) of the example code you are using.
8.@ Phase 5 - The Roller Coaster!
For this part of the project, you will turn in the actual roller coaster simulator, and the required documentation. As with all projects, we will evaluate your project both in a demo session (where you get to show it off) and by evaluation of your code and documentation.
The basic part of this assignment is to provide a train going around the track. You must:
- Provide a user interface to look around the world.
- Provide a user interface that allows control points to be added, removed, or repositioned. Note: even if you do a very advanced interface, you should display the control points and allow for them to be edited manually.
- Have a track that is (at least) C1. Your program should draw the track.
- Have a train that goes around the track (with a play button or key to start/stop it). The train should always be on the track. Your train need not be fancy, but it should be obvious which end is the front. And your train should not distort in wierd ways as it moves (if it is not rigid, it should be for a good reason).
- Have the train oriented correctly on the track. The train should always face forward if the track is flat, and mostly face forward on a 3D track (some cases, such as vertical tracks or loops can be hard, a basic assignment doesn’t have to get those right).
- Allow the user to “ride” the train (look out from the front of the train). There should be a button or keystroke to switch to this view.
- Have some scenery in the world besides the groundplane.
- Your program is properly documented, is turned in correctly, and has sufficient instructions on how to use it in the readme file.
- You should have a slider (or some control) that allows for the speed of the train to be adjusted (how far the train goes on each step, not the number of steps per second).
If you’re curious, my 1999 sample solution (mikes-train.exe) does not do all of these. (the train has no front, and the only scenery is the point light source - also, there’s a wierd bug where the train stretches out when it goes down a hill).
8.1@ Advanced Features
Meeting the basic requirements will get you a basic grade (definitely a C or better). But to get a better grade, and to really make the assignment fun, you should add some advanced features to your train.
Note: the exact point values for each of these is not given. The rough guide here will give you some relative importances (big features are worth more than small ones).
We will only check the features that you say that you have implemented correctly. Partial credit will be given for advanced features, but negative credit may be given for really incorrect features. (so, its better to not say you implemented a feature than to show us something that is totally wrong).
Also, remember that in your demo, you will have to show off the feature, so think about what demonstration will convince us that it works. For example, with arc-length parameterization, you’re best off being able to switch it on and off (so we can compare with the normal parameterization), and think about a track that really shows off the differences.
Arc-Length Parameterization (BIG)
Give a tension control for the splines (small)
C2 Curves (medium)
Direct Manipulation or Intepolating C2 Curves (BIG)
Draw nicer looking tracks (medium)
Correct Orientation in 3D (medium)
Save and Load Tracks (small)
Have Real Train Wheels (medium)
Have Multiple Cars on Your Train (medium)
Have People On Your Roller Coaster (small)
Implement simple physics (medium - its actually not hard once you have arc-length)
Have a “sketch-based” interface (10-20 points, depending on features implemented)
Lighting (small)
Hack Shadows (small)
Headlight for the Train (small)
Have the train make smoke (small/medium)
Something so cool we can’t predict it
9.@ Documentation
Your documentation must have 3 parts:
User Documentation
Technical Documentation
Readme.txt
10.@ What to turn in
By the deadline (November 12th, 11:59pm) you must turn in:
- Everything needed to compile your program (.cpp files, .H files, .vcproj files, .sln files, and UI files or other things your program needs). Be sure to test that your program can be copied out of this directory and compiled on a Storm computer.
- Your Documentation Files (user.txt (or user.htm), technical.txt (or technical.htm), and readme.txt).
Late projects will be accepted according to the class late policy. We expect to do demos on 11/19, so this would be the very last opportunity to turn in very late projects.
11.@ Some Hints
In case it isn’t obvious, you will probably use Cardinal Cubic splines (like Catmull-Rom splines). Cubic Bezier’s are an option (just be sure to give an interface that keeps things C1. For the C2 curves, Cubic B-Splines are probably your best bet.
You should make a train that can move along the track. The train needs to point in the correct direction. It is acceptable if the center of the train is on the track and pointing in the diretion of the tangent to the track. Technically, the front and back wheels of the train should be on the track (and they swivel with respect to the train). If you implement this level of detail, please say so in your documentation. It will look cool.
In order to correctly orient the train, you must define a coordinate system whose orientation moves along with the curve. The tangent to the curve only provides one direction. You must somehow come up with the other two directions to provide an entire coordinate frame. For a flat track, this isn’t too difficult. (you know which way is up). However, when you have a roller coaster, things become more complicated. In fact, the sample solution is wrong in that it will break if the train does a loop.
The sample solution defines the coordinate frame as follows: (note: you might want to play with the sample solution to understand the effects of this)
- The tangent vector is used to define the forward (positive Z) direction.
- The “right” axis (positive X) is defined by the cross product of the world up vector (Y axis) and the forward vector.
- The local “up” axis is defined by the cross product of the first two.
Doing arc-length parameterizations analytically is difficult for cubics. A better approach is to do them numerically. A simple way to do it: create a table that maps parameter values to arc-lengths. Then, to compute a parameter value given an arc length, you can look up in the table and interpolate.